Frame Blending with Motion Vectors
TFlow
At Tuatara we trivialized this technique to the point of making it a one-click solution using our Unreal and Unity plugin TFlow.
- Check TFlow online interactive demo.
- Get TFlow for Unreal.
- Get TFlow for Unity.
- Standalone licencing is also available by request.
TFlow makes my tutorial somewhat deprecated but I believe there is still value in breaking down the technique so I’ll keep it posted for posterity.
Original post continues below.
Introduction
This is my variation of the frame blending technique first developed by Guerrilla Games for Killzone 2, you can find a link to their publication and other resources at the bottom of the post. The aim is to extend the utility of animated textures by distorting them with motion vectors to procedurally generate the inbetween frames. This comes at a cost of shader complexity and texture memory but the results are worth it, especially for special cinematic moments.
Here’s an example of what you can expect to achieve with the technique described in this tutorial:
Those of you familiar with video editing and compositing might liken this technique to what a plugin called Twixtor from RevisionFX does, it’s essentially the same thing but in our case the motion vectors aren’t generated on the fly, we’ll have to create them manually.
For this breakdown I’ll use Unreal 4, FumeFx for 3dsMax and After Effects with a RevisionFX plugin called “Motion Vectors: Create” that comes with the pro edition of Twixtor. You should be able to achieve the same with any other software that can output normalized motion vector data but your results may vary. The end result of this technique depends entirely on the motion vector data so this can be the most arduous step to get right and it might require some experimentation.
Motion vector data
To render motion vectors out of FumeFX you’ll need to make sure you’re outputting the velocity channel before you simulate. Additionally you’ll need to go to Rendering – Environment, select “FusionWorks Renderer” and under parameters check “Create Channels” and “Image Motion Blur” or the velocity vectors won’t render. Afterwards you can render them as a separate render pass called “FusionWorks Velocity”. You can play with the “max velocity” parameter to make sure you’re not hitting 0 or 1 if you check the pixel values, you want to stay midrange otherwise you’re not getting a full range of motion data.
When you bring the velocity pass to After Effects (or other compositing software) you might have to modify the gamma. If you’re not sure, one way to check is to remove the blue channel and make sure the empty area has the following values:
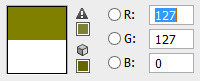
It’s worth pointing out you might have to invert x or y components of your motion vector to make sure Unreal interprets it properly.
Alongside motion vectors you’ll also want to render the base texture with an alpha channel along with any other texture passes you might have. This will be the final output and we’ll use the motion vector texture to drive it.
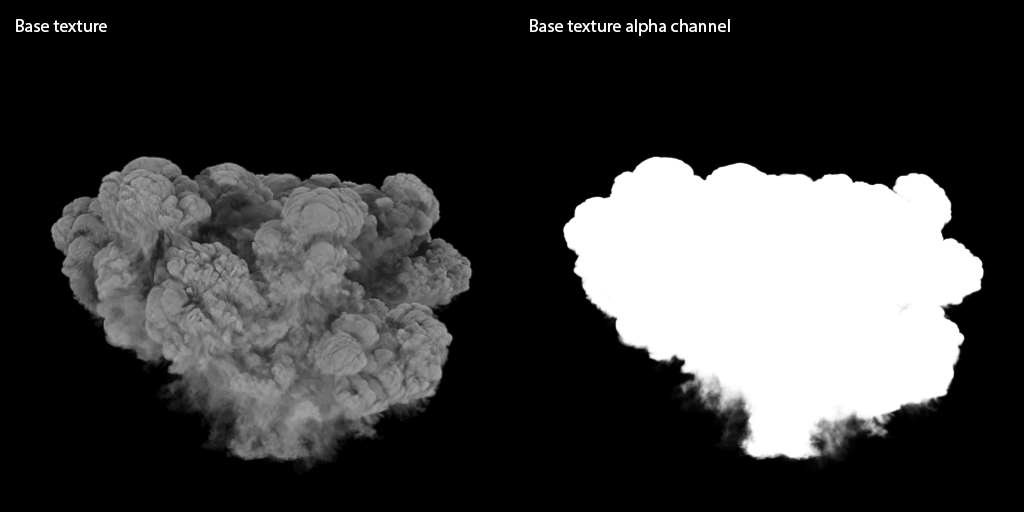
Use the alpha channel to stencil the motion vector texture, see image below. You can also blur it sligtly, this seems to help with frame blending later in Unreal.
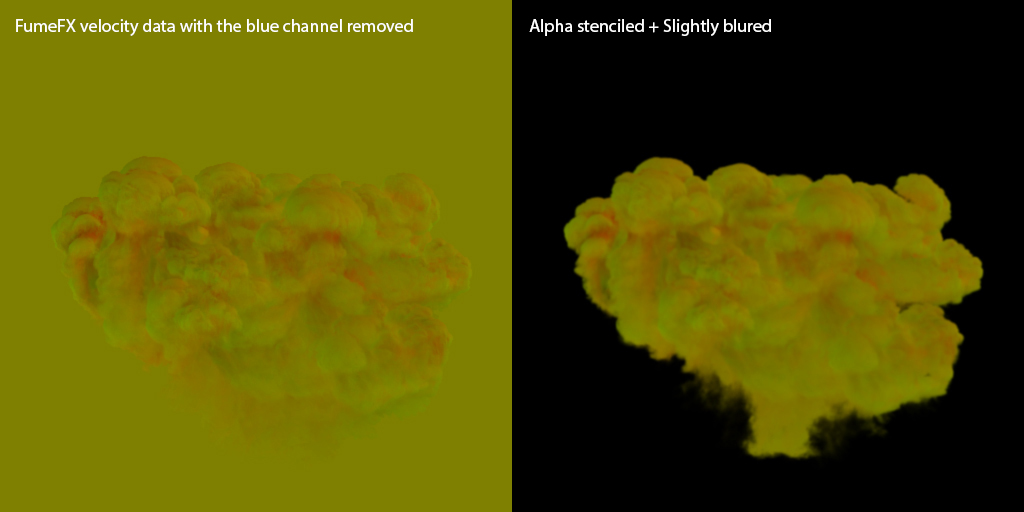
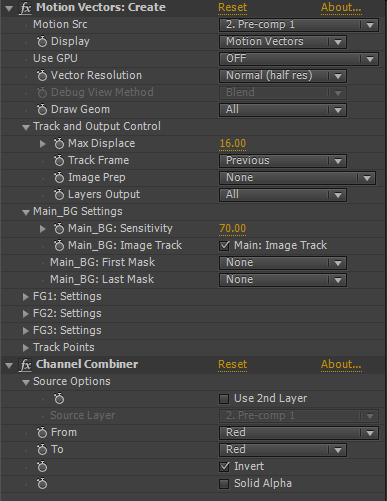
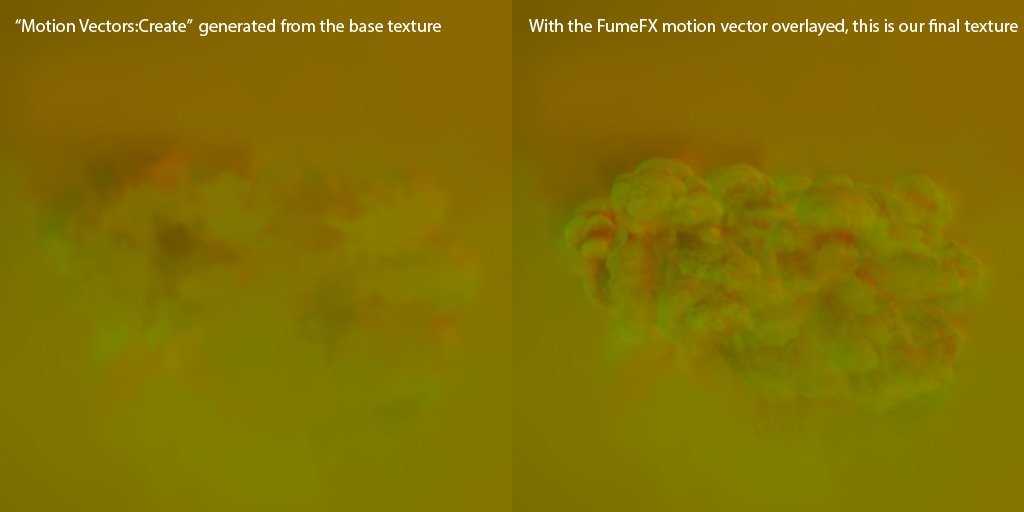
Next I use the “Motion Vectors:Create” effect that comes with Twixtor pro to generate additional screen based motion vectors from the base texture. I found this step to be a requirement if I wanted to use a single motion vector texture. The main idea behind this is to generate some extra motion data beyond the range of our simulation, otherwise the pixels won’t distort beyond that edge. I also needed to invert the red channel to match the output of FumeFX.
You can see the result of the “Motion Vectors:Create” vectors I generated from the base texture on the left and FumeFX motion vector layer added on top of that on the right. Because I’ve stenciled and blured the FumeFX layer it blends nicely with the one on the left.
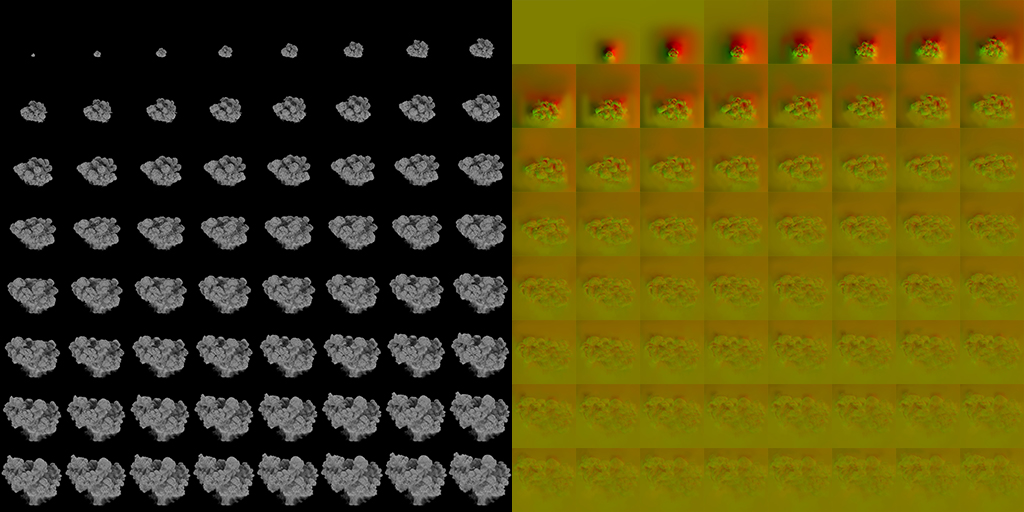
Below is an example of final textures you might end up with. I’m going with a 8×8 SubUV, so 64 frames, roughly 2 seconds at 30fps but we’ll be able to extend that more than 10 times while keeping the same perceived frame rate. In production you’ll probably go with a smaller amount of SubUVs to keep the texture size smaller. The motion vector texture can be scaled down significantly, I used a 512 for a 4096 base texture but it must be uncompressed in the engine, otherwise you’ll get a lot of artifacts. Also make sure to untick sRGB when importing to Unreal.
Shader
The shader is pretty straight forward. The main idea is to build custom SubUV cross-blending, similarly to what Particle SubUV expression does automatically but we’ll need to do it manually to control the next step. In addition to interpolating from one subimage to the next we’ll need to distort the current subimage pixels towards the position of the next and similarly distort the next one back towards the current one so they kind of meet in the middle. We’ll achieve this distortion using the motion vector texture we’ve made.
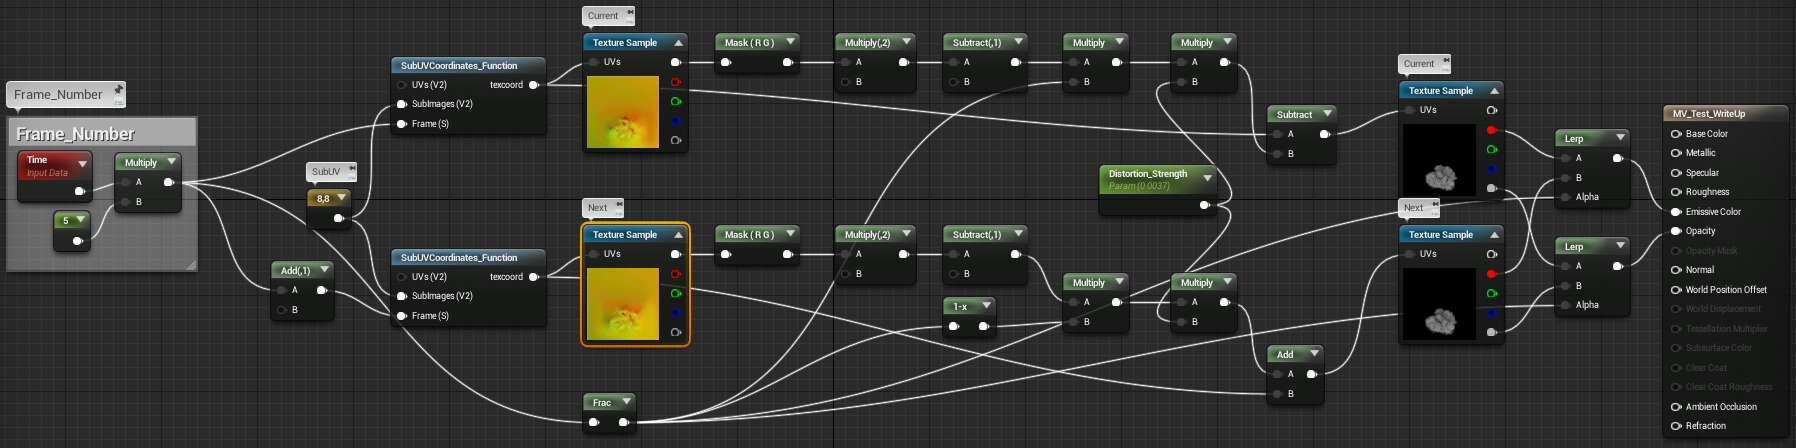
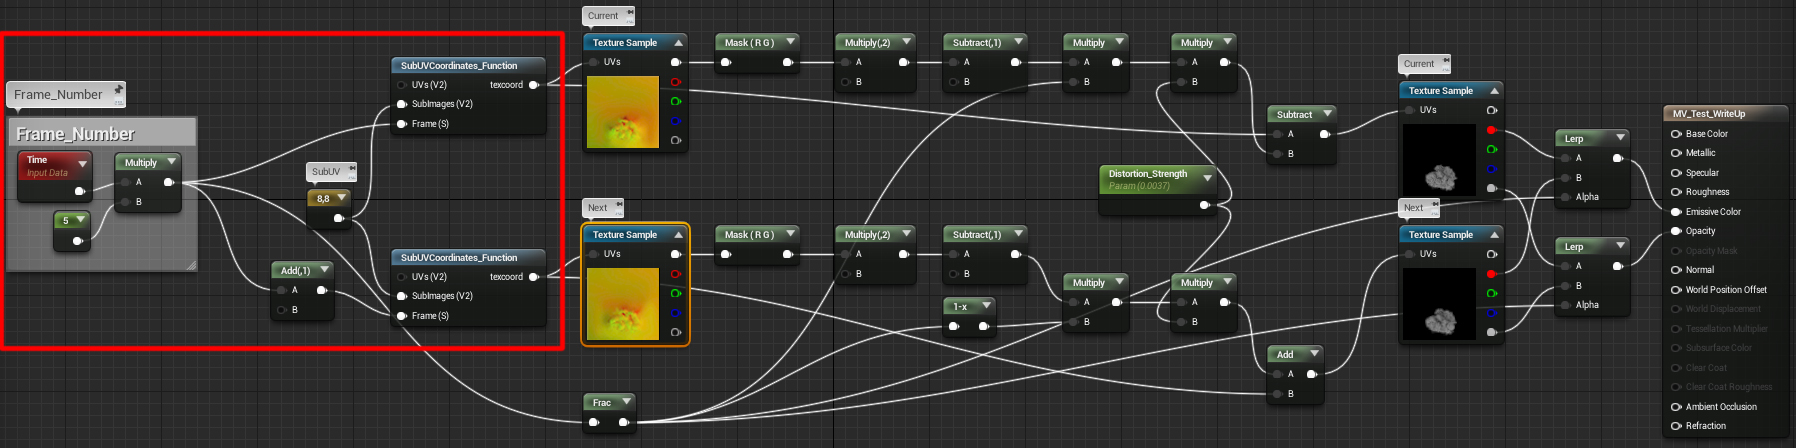
Here’s the completed shader network we’ll be creating followed by a breakdown:
SubUV Function:
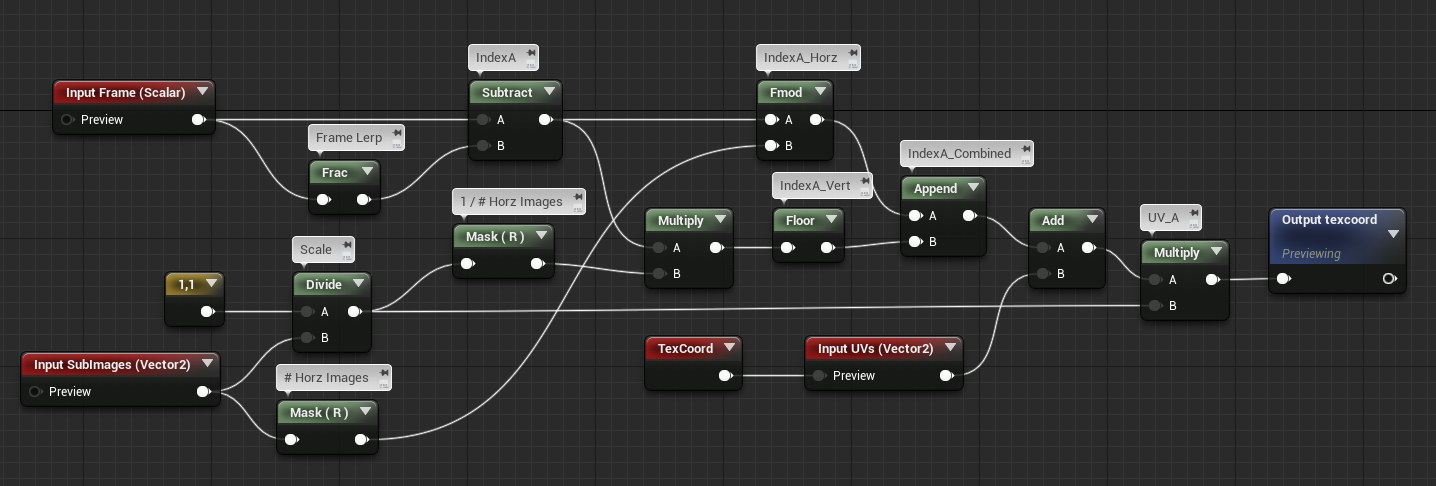
As you can see we’re using a function in our shader, to get the SubUV funcionality. We’ll modify the existing one that comes with Unreal 4 so it outputs texture coordinates instead of an RGB channel, see image below.
SubUVCoordinates_Function:
Frame control:
We’ll use two sets of SubUV functions we created, one for “Current” and one for “Next” frame. For testing purposes we can drive the animation with a time expression as seen below, later we’ll want to use a particle color channel or a dynamic parameter to drive it in Cascade. It’s important to always add 1 to the “Next” frame value to offset the SubUVs by one frame.
Move to float range:
We’ll plug the SubUV function output into our motion vector texture. Following up we’ll first use a component mask to mask out the z component of the vector, we’re not using it. Next we multiply the map value by 2 and then subtract 1 to move it into the -1.0 to +1.0 float range, this will keep the distortion centered. We’ll do this for both branches of the shader, current and next.
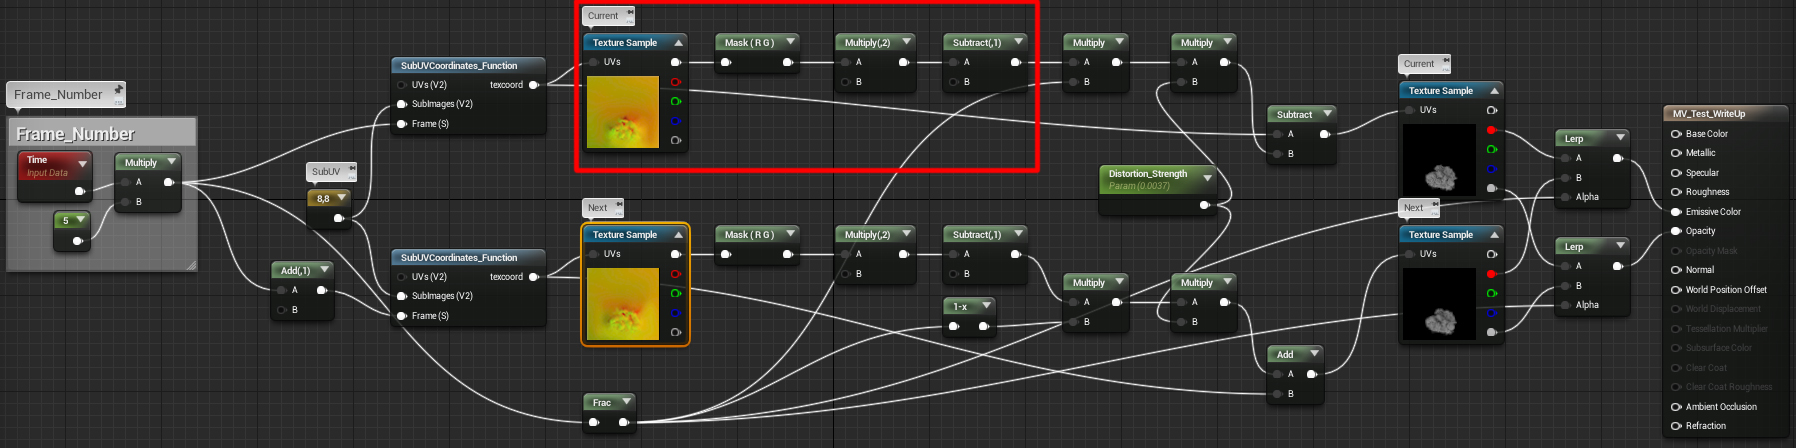
Current Frame:
After getting the motion vector in float range we’ll use the frac to figure out the percentage of where in the frame we currently are and multiply the distortion amount based on that value, there will be no distortion at the start of the frame and full distortion by the end. Afterwards we’ll subtract the output from the SubUV function to add the distortion to the base texture.
Next Frame:
Very similarly, after getting the motion vector in float range we’ll use the inverted frac to figure out the percentage of where in the frame we currently are but this time backwards so there will be full distortion at the start of the frame and no distortion by the end. Afterwards we’ll add the output to the SubUV function to subtrack the distortion from the base texture, reversing the process.
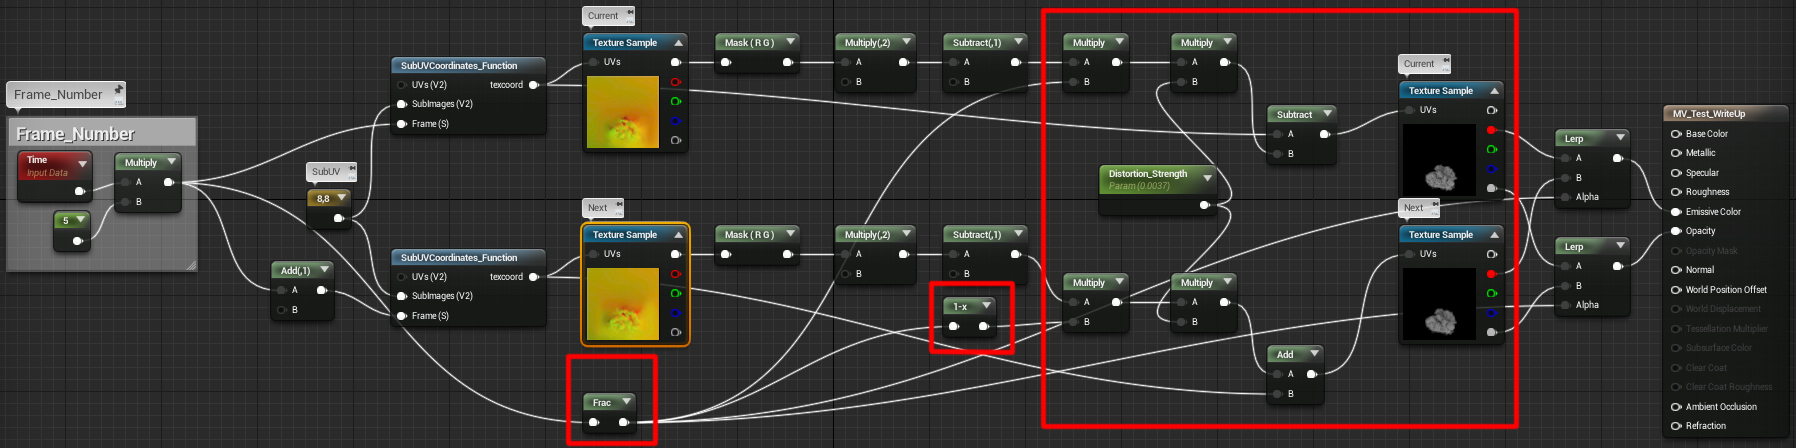
The scalar parameter “Distortion_Strength” will control the amount of distortion as described above. This is an ambiguous value you’ll have to eyeball, it has a direct correlation with the SubUV size and speed of your texture, if you have fewer frames, you’ll usually want this value to be higher, UVs will need to get distorted further to catch up to the next frame. I generally found myself using very low values with this setup.
Cross Blend:
Finally we’ll use a linear interpolate expression of both the Current and Next frame with a frac of the time expression for the alpha to cross-blend them together as we flow through the frame. You’ll need to do this for every texture channel you’re using.
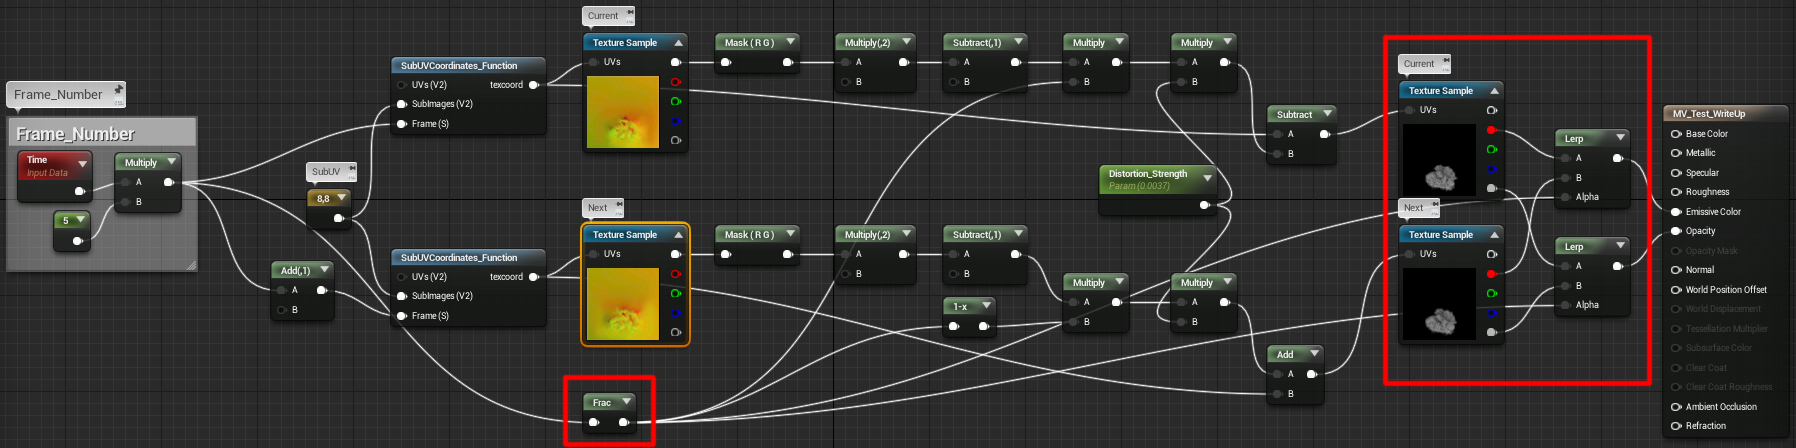
It can be difficult to grasp the logic but to put it simply what happens is, the current frame starts as it is, then it gets more and more distorted towards the position of the next frame, similarly but inverted, the next frame starts fully distorted back towards the current frame and then goes forward to its original position. When we finally lerp the two they cross-fade to each other to produce a seamless fluid motion. This is happening continuously frame to frame.
Summary
I see this being especially useful for large scale effects, slowmos and sequences where you need the effects to drive the shot and evolve naturally. Most of the time however, visual effects in games tend to have a short lived screen presence for gameplay reasons so regular animation ranges and cross-fading work just fine, this definitely doesn’t replace the existing workflow but it’s a very nice addition to any artist’s arsenal.
The main difference between my approach and the technique Guerrilla Games described is in the motion vectors. They apparently use 2 motion vector textures, one is made specifically for blending to the next frame, and the other for blending back to the current one. As far as I can tell I’ve been able to reach the same visual fidelity with the benefit of using less texture memory, because I use a single motion vector texture. However, their technique might be more accurate when dealing with smaller SubUV textures and I believe they generate their vectors procedurally with Houdini, taking some of the manual labour out of the process. Ultimately I’m not familiar with their approach enough to make any final calls so don’t take this at face value.
Resources:
– http://www.guerrilla-games.com/publications.html
– http://www.revisionfx.com/products/twixtor/
Credits:
– Ryan DowlingSoka of Black Tusk for helping me figure this stuff out.
– Guerilla Games for inspiration.
18 Comments to Frame Blending with Motion Vectors
Follow me
Search my website
Latest Posts
- Update August 7, 2018
- Let Them Come Released! October 12, 2017
- Let Them Come – Release Date! September 27, 2017
- Let Them Come, Update October 12, 2016
- Gears Of War 4 is out! October 12, 2016
Get QuickTime!
- Get QuickTime here! You will require quick time player to view some videos on this site.
Hello,
I love your tutorial but i am having a hard time with the motion vector data section, i am not getting the same result as yourself with my fume Fx velocity data. can you please give me more information regarding this subject ? at the present moment my velocity data is a white color and i dont quite get your texture result without the blue channel. can you please let me know how you got the final result.
Thanks!
Hi James,
Are you sure you are exporting the right channels with your Fume sim? Check the output tab in the general properties and make sure you are exporting velocity as one of the channels. Click the “set” button to access the dialog and add it if that is not the case.
After the simulation completes you’ll be able to render the velocity pass as a render element like I described.
Let me know if this helps.
Hello Klemen,
I have done that, i do have my velocity channel exporting after that in my render panel under volume shading i am selecting channel data so i chose Velocity. Since i am creating a radial air explosion i am getting as a final result a blod which is representing my entire grid? if you would like i can send you everything at your personal email.
please let me know, and thank you for all your help!
Hey James, actually leave the volume shading on standard, you’ll want to render out the velocity channel as a separate render pass. Open the main render dialog (F10), then go the “Render Elements” tab up top and add a “FusionWorks Velocity” element. Any render elements you have will then be rendered in addition to your main render. Keep an eye on the Max. Velocity parameter on the bottom of the dialog.
If you still have issues feel free to send me the Max file and I’ll take a look.
Hello again Klemen,
so i render out my velocity pass with the information that you gave me yesterday, is it normal that the render look like a Z-depth pass ? i only have a white shader render ?
I am sorry to disturb you with all these question but thank you so much with everything.
Hi James, don’t worry about it, it’s not a problem at all!
That doesn’t sound right, would you mind sending me your max file? It should be much easier to identify the issue that way.
klemen(at)klemenlozar.com
Hello Klemen,
i will send you the max files but do you need in output of my fumefx also? if you need the outputs the attached files will be huge lol
I just sent you my max file please let me know if you notice something weird.
Hi James, I was able to figure out what was happening. I neglected to mention an additional step you need to make to render out a velocity pass, my bad!
Go to Rendering – Environment, select FusionWorks Renderer and under parameters check “Create Channels” and “Image Motion Blur”, now you’ll be able to see velocity vectors if you render a FusionWorks Velocity render element.
I’ll update the breakdown with new information.
hi Klemen,
That’s an awesome tutorial. I had everything I needed but I needed to learn how to implement the shader in Unreal.
Let me just say something. When you explained the “Distortion_Strength”, you say it’s an ambiguous value. And it’s not, you can get the exact value of this parameter by dividing Max Displace (Twixtor) by the resolution of your texture.
I hope this helps 🙂
Francisco.
Hey Francisco!
Glad you liked the tutorial and thanks for that tip, that makes it much easier to nail down!
Waiting for some video tutorials
thanks anyways it`s extremly helpful
btw. do You know some place/tutorials to learn vfx for games ? most of the staff is for movies/comercials
I would like to learn FVX for videogames (making some skill effects mostly, for games like DOTA or LoL)
I want to have your children.
Hi Klemen! I was wondering if you had any idea how to get the same result using Houdini instead of Fume FX? It’s got to be possible, but I’m pretty much a complete Houdini noob when it comes to anything beyond the basics…
Cheers!
-Jan
Wow this is really cool stuff.
I guess the only problems are:
*That Adobe + Twixtor step is a really small part, yet really expensive. I wouldn’t be able to convince my company to buy >1000 dollars of software for that small step.
*The vector has to be uncompressed!!?! Geeze then I think I rather just use higher resolution basecolor so I can squeeze more flipbooks in there. However I still see the use of this if a game has slowmotion modes here and there.
/Niber – http://Niberspace.com/blog
how can you control 2 subUV module diffrently in cascade???
Niber,
For what its worth.. In my findings, the uncompressed texture can be very, very small in size… Sometimes in areas of 16×16 per frame with still having beautiful results.
Sorry for lack of communication from me lately.
Niber, a base texture like that would come out enormous if you wanted to have reasonable resolution. Might depend on your studio pipeline but I think a small uncompressed MV texture is very viable.
Seth, very true, that’s my experience also.
I have to hype this upcoming tool from Alex Underhill that could really help reduce the time and cost requirements for generating motion vector textures, check it out on the link below:
http://facedownfx.com/
Looks like an all around must have for vfx artists working in games.